Showing posts with label Autism Classroom. Show all posts

Monday, July 7, 2014

Special Educator Bloghop

Jamie over at Tales of a Carolina Girl is hosting a Special Educator Bloghop!  Figured I'd join in as I LOVE to see other special educators blogging.  Click on the button below to head over to her bloghop!


Here's Mine!!

Name: Erin

Job Title: APPLE Teacher (teacher of children with Autism and severe behaviors)

Grade: Middle School (6-8) 

How Long I've Been Teaching: 15 years (my husband just said "have you really been teaching for 15 years??  Good lord you're old!"  Thanks honey, thanks a lot!)

Advice: I have two things:  First:  Beg, Borrow, Steal, and Create!!!  As a special education teacher, you are often expected to teach all subjects and multiple grade levels.  It is IMPOSSIBLE to be a master of every subject on your own.  Find others who you can get ideas from.  Find others who will help you create items.  Follow bloggers who share their activities, ideas, and printables.  Collaborate with others.  You are not in this alone.  There are those few teachers out there who will not share.  Do not let those people get you down.  Move on and find others who will share.  When you look through my classroom, you will find that over half of my materials are items I have found through others!  If it is an item I created, I probably got the idea from someone else and built on it!  Just always remember, you are NOT in this alone, there are others with the same passion you have that are more than willing to share their ideas so that your children can thrive!!!  

Second:  Behavior, behavior, behavior.  If students behavior is not under control, you are not having true success.  As you plan for your classroom, determine how you will manage behavior.  Create reinforcement systems (or find good ones from others - see above).  Create behavior charts (again, see above).  Determine what behaviors you will focus on and what techniques you will use.  When school starts, implement your interventions, assess their effectiveness, and make adjustments!  

Thanks for the bloghop Jamie!!  I can't wait to learn from other bloggers!

Tuesday, June 24, 2014

Work Boxes

Work Boxes: As mentioned multiple times in the past, I have a TON of work boxes.  Here are a few more:


Reading office supply sort: Random items from around the classroom are put into the container. Students read the label at the bottom of the sorting system and place the correct number of items!  So easy to setup, and FREE!


Filling Medicine Box:  I used small candies as the "pills".  Students got instructions on what "pills" were needed in AM/PM.  Have to fill out weekly medicine storage.

 
Item sort (similar shape edition):  In this task, students sort random items, but many have very similar shape, (rounded vs square edges).  Students sort accordingly.

 
Another shape sorter - this came as a math kit, I just dumped it into a work box!

Fine motor activity:  Students take the small pegs and push them into a piece of foam.


More to come in a few days!!!


Wednesday, September 11, 2013

Daily Schedules - top priority

Wow, it has been a tough two and a half weeks.  My kiddos are VERY BUSY!!!  With new kiddos and new staff, I feel like my head is spinning with just teaching procedures.  I'm finding that now I have to write out specific step by step instructions for my para's on how to deal with student behavior, how to implement reinforcement systems, etc.  I guess I took for granted how knowledgeable my staff was last year!!
Anyway, my top priority has been setting schedules, both for students and staff.
To ensure schedules are most effective, here are the steps I take:
1.  Set up a excel document with 15 minute segments down and each student's name across the top. (once I get some things set up, I change the times to match things like bells, etc)
2.  Fill in the non-negotiables (lunch, gened, etc).
3.  Set up group times
4.  Fill in rotations
5.  Assign staff to specific rotations and students

To make it all work correctly, this year I had to do NINE drafts of this!!  I kept having to rework groups, ensure that kids who needed extra assistance were assigned 1 staff who supervised others while at independent.
Here are three versions of the schedule, just so you can see the progression.  I know that there will still be a few changes, and I still have a couple of spots that need to be filled, but at day 13, I'm feeling pretty confident!

Version 1:  Made before I actually knew my students and staff very well.  In this one, I set non-negotiables and groups and then just blindly filled in students based on that information I had. . . We used this for 2 whole days!


Here is version 4. . . I had already made multiple changes.  In this schedule, I created a couple of new stations, took out some stations, and began to assign staff more appropriately. . .

This is the current schedule. . . In this one, every student is accounted for with staff members.  Students are either working with staff directly or supervised (when in parenthesis).  Yellow table is where I work with students, at the blue table my stronger para works on reading, fluency, and the red table is where students play a game of some sort and work on turn taking and social skills.  I am really enjoying this schedule so far, but you can see that there are still a couple of ??.  These are times that are not filled completely with meaningful activities so I am still determining what to do.  If you have any suggestions, I'm more than open!!
Key:  MM-morning meeting; cards/Ipad-language master, then Ipad activity;  I-independent; WD-work drawers (set of 6 drawers that target IEP objectives in the generalization phase); WB-work boxes (pre-vocational tasks); TT-another time I work with students. . . 


So. . . that's the way I make schedules.  How are you doing with your schedules??  Anything you think I should try??


Saturday, October 27, 2012

Grades - How do you do it?

I have been teaching self contained classes for 14 years, and "grades" have been a source of constant distress.  Districts require us to give them, but have never given us a method on how to take them and make them meaningful to our students learning.  I have had many methods of creating grades in the past, including guessing, a system where all kids getting an 80 the first nine weeks, an 85 the second, etc, and just giving letter grades of A.  None of these really communicate what the kids progress is though.

Last year I finally came up with a system that provides the most appropriate grades I think possible.  It grades students on their progress on IEP goals.  It is quite a complicated system, but once you set up your spreadsheet, you just plug in the information and go. . .

I start by creating a spreadsheet (I use Excel) with each objective separated by subject area.  I make sure they have all four core subjects, then I plug the other objectives (rec/leisure, daily living, communication, etc) into the other two class periods I teach (this year skills for adult living and personal management).  I put in the Goal title, the objective purpose and then a short snippet of what the actual objective is.  After each subjects objectives, I put a column for the goal/subject average.  I like to color code each subject/goal area for ease in finding objectives as well as for helping to create the grade.
Here is the beginning of a spreadsheet. . .


The next step is plugging in dates.  I average each weeks data for each objective and input that weekly average into the sheet.


After this, I enter a field for the average of each objective's weekly data for whatever time period is necessary for a grade (progress report, report card, etc)


The next step is CRUCIAL. . . you have to enter a field for the mastery criteria of each objective.  This is critical because you want to grade kiddos on their progress towards mastery of the objective.  If mastery is 3 of 5, then all 3's would mean they have a 100 in that objective. . .


Lastly, you enter a field where your grade is created. . .


Ok, for the formulas. . . Hopefully you know how to get an average. . . to get a grade for each objective, you take the average and divide it by the criteria for each column.  To get a grade for the entire subject, you average together each objective in that subjects grades. . .
Here is an example of this in action:

The formulas in Excel automatically create the grades.  I do have to go back and change any grade over 100 (when a kid is exceeding criteria set on their objective) to a 100 so that it does not raise their overall subject grade too high. . . Here is how that looks on the above data:


So, in this example this student has a 100 average in behavior, a 96 in Self-care (those grades are then averaged to a 98 and put in as the grade for Personal Management), a 55 in ELA (which I put as a 70 on a report card - none of my kids ever fail a subject) and a 100 in Social Studies.

That's how I do my grades.  Like I said, the setup can take a long time.  However, once it is set, you don't have to do anything but put in your weekly data.  If a parent asks how you got a students grades, you can show them the child's data averages and how they relate to the criteria set.  I have had parents hug me and tell me how much they love this system!  I know that it eases my conscious and makes me feel better about my ability to look at progress and measure it in number grades!


Work Box Weekend

Ok, so I've been absent from posting for the past week.  It has been one of those weeks.  The type where you go to school at 6AM and leave at 7PM and still don't get all that you need done.  I've had a kid testing the limits and tantruming for HOURS, parent conferences, grades due, IEP updates due, etc, etc, etc.  BUT, the week has ended and I'm getting back on track.
Here are some more work boxes to get me back in the posting routine!

Button Practice - I have two students who have buttoning/unbuttoning objectives.  I cut the waist band out of a few pairs of mens pants with the various types of buttons that these students wear.  The students have to put the pants around their waist and button them, then show me, then unbutton and put back in the box.  It has helped them tremendously!  (I forgot to take a picture of the actual box)


Animal Match - Students match small animal toys to pictures of the animals.


Folding T-Shirts - Last year, my husband gave me the best Christmas present EVER. . . a flipfold board for folding t-shirts. This is great for ALL kids and creates a perfectly folded t-shirt!


 Spring Sort - Students create a package of items from Easter sales.  Includes an egg, a spinning top, a maze, a straw and a bunny straw holder.  No fancy template necessary - just a hand-drawn template which kids follow.


Candle Pack - Students package six candles into their packages.


Saturday, October 20, 2012

Work Box Weekend part 4

"How do you make all your work boxes?"  I get this question a lot from people who come into my classroom.  For me, making work boxes has become almost an obsession.  Everywhere I go, I look for things I can use in a box!  I am addicted to dollar stores and dollar sections of stores.  I love going to the hardware store and roaming the aisles.  I spend an inordinate amount of time looking at items and wondering, "did a person have anything to do with packaging/making/coallating that?"
Ok, so here's a picture of last weekend's dollar tree trip.  Actually, to be honest, this was trips to 3 different dollar trees.  Yes, you can visit 3 different dollar tree's in one day and yes, you can make purchases at all 3!!!  :)
As you can see, I purchased a wide array of items.  I love, love, love the small containers with lids.  I use these as packaging containers in multiple boxes.  I got a few puzzles, which will go into our leisure section.  The bowling ball games became a color matching and packaging activity.  The pencil erasers, grips and sharpeners went into a pencil assembly task.  The ice trays became a sorting activity.  The color pencils became a color pencil package activity.  The regular pencils (which are packaged as 5 each of  5 different colors) became a pencil package activity.  There are small beads in there that are used for a bead pattern activity.  The fall stickers are used for arts or for fine motor.
The way I choose tasks really depends on my kiddos at that time and my mood.  I try to look at items and think "is that something someone would ever have to package or make?"  Sometimes the answer is yes and I make sure to purchase that.  Sometimes the answer is no, but I know it can address some target skills (following a template, following written directions, counting, fine motor, etc) sos I purchase that.  Sometimes it is no, but it's just pretty, so I either purchase if I'm feeling the addiction, or I skip it!  :)

Here are pictures of some of the finished boxes I made from the above materials.  

 
 Pencil Pack - Students package 20 pencils into a box.  Higher kiddos can follow the visual above and kiddos who need a little more support follow the visual to the left.


 Color Pencil Pack - Students follow the visual cue card to package one of each color into their box.

Bowling Pack - Students follow the template to package a mini bowling ball set


Color Pack - Students follow the color template to place pom poms into a small container with lid.


Bead Pattern - Students follow the picture cue to put beads on in a certain pattern.


Thursday, October 18, 2012

Student Rotations - Work with Teacher

It has been a very long day.  I had a student who basically stayed in tantrum mode for 5 of our 8 hours!  He is new to my class, so he truly didn't believe I would hold firm in my expectations of him.  Thank goodness, I did.  It was hard at about hour 4, but we made it and I expect a shorter tantrum tomorrow!

Anyway, this tantrum kind of zapped my brain cells.  I want to post this, but don't feel my writing will be especially clear.  Please forgive me if I ramble or don't make sense!

Ok, here goes.  In my class, we have student rotations that include independent work, work drawers (a set of 6 individualized activities), Vocational, Computer/Ipad, leisure, and group.  I plan to show you each of these stations in different posts.  Today I will focus on our Work with Teacher station.  This is where I try to work 1:1 or 1:2 with students on specific objectives and where the most data is taken.

An overview (this is a very messy picture, I took it after school while I was using the table to organize and create materials) - there is a kidney table where I sit with the students.  The whiteboard houses visuals and is used to write prompts, notes for things I need to create, etc.  Behind the table is a small bookshelf where I keep each child's IEP box.  To the left of that is a drawer system where materials are kept that I use for multiple students.


This is the shelf behind the table.  On it I keep each student's IEP box and then general items that I may need to use with kids.  IEP boxes hold materials that target specific IEP objectives.


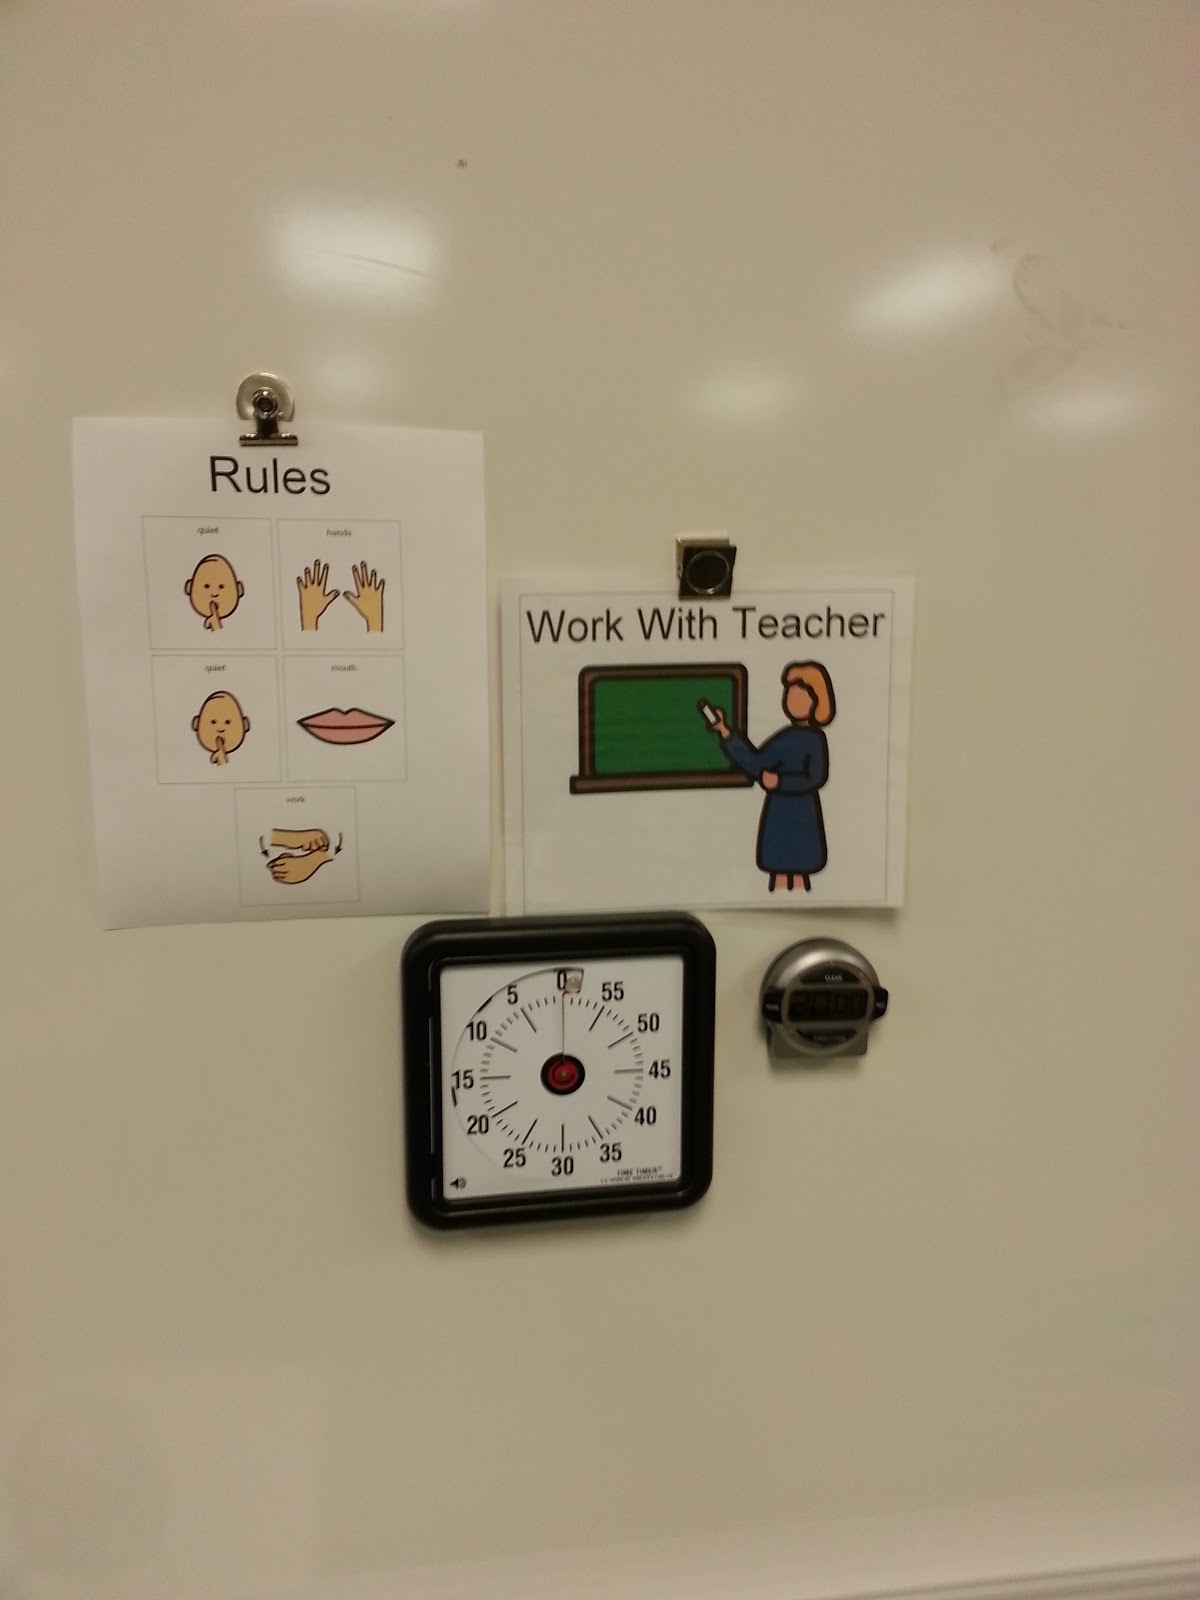
These are the visuals that are located on the white board behind the table.  There is a visual timer, along with a second timer which I can actually hear.  The rules are also posted.


Here is what I keep in the drawers:

Commonly used environmental print cards, noun picture cards and color sorting cards.

Visuals for administering the ABLLS (from http://www.trackingsheets.net/) and some edible reinforcers.

Photo cards for receptive discrimination and identifying common objects.

Paper of all sorts and writing utensils.


Flash cards and games that can be played as a small group.

Maps and other items for Social Studies.


Now for the IEP boxes:


This is one student IEP box.  It contains all items I will need to use during our time together.


One task in the box is an object to picture match.  Real photos are used to match to items.

This is another student's IEP box.

One task in this IEP box is practicing following prepositional directions.  I use a sentence strip and a cup to model the correct response.

That is a quick look at my "work with teacher" area.  There are a ton of other things I do during this time, but these are the major components.  Very efficient and easy to use!